It isn’t just curb appeal that’s drawing potential homebuyers to your house anymore. With the majority of people starting their house hunting online, your home’s appeal and the way you capture it are more important than ever. In fact, 87% of buyers who use the internet to search for homes find photos very useful, according to a report by the National Association of REALTORS®.
Even the most brilliant, witty and thoroughly detailed online listing will get overlooked if there are poor quality pictures of the home or, even worse, no pictures at all. Sure, listing your home for sale may get it noticed, but great pictures make your home stand out and get people in the door.
“With hundreds and thousands of homes to choose from, a listing has to stand out from the crowd. You only have a split second to capture buyers’ attention,” says Russell Volk, a real estate agent with RE/MAX Elite in Bucks County, Pa. “The easiest way to do so is with beautiful photography.“
Hiring a professional to take your real estate photos is ideal, but that can set you back a few hundred dollars. If you’re a seller on a budget, you may opt for taking pictures of the home yourself. After all, how hard can it be? However, taking real estate photos is more strategic than you may think. And with the sale of your home often hinging on the quality of your photos, it’s important you take the necessary steps to produce high-quality, professional-looking photos for your listing. This guide will help you create the kind of listing photos that will help your home stand out amongst the rest.
“Sometimes there is a lot of work to be done outside the camera that is going to make or break the shot,” says Corey Crossman, a real estate broker and REALTOR® with Coldwell Banker Advantage in Raleigh, N.C.
Much of that work comes in preparing your home, your equipment and yourself for your photoshoot. On the day you plan to take your photos, you’ll have a limited amount of time to have optimal lighting. You don’t want to waste your time figuring out how to shoot each room, fiddling with gadgets or waiting for a storm to clear so you can take outdoor pictures. Here’s what you can do to prepare for a simple and smooth photoshoot.
You won’t need state-of-the-art equipment to capture high-quality photos, but a few small gadgets will make a big difference. First things first, decide what type of camera you’ll use. A digital single-lens reflex (DSLR) camera has many different settings and allows you to use different lenses. This type of camera is the best option for taking great photos, but it can be a big investment. If you’re only going to use the camera to take your listing photos, consider renting one or using a good quality digital camera that produces sharp photos.
Cell phone cameras have come a long way and many sellers choose to use their phones to take pictures of their home. However, if you choose to take pictures with your phone, do the extra work to make them look like they were taken with a professional camera. Volk recommends using the latest version of your phone, turning on the high-dynamic range (HDR) functionality and utilizing your device’s built-in photo editing software. There are also several apps that allow you to edit photos right from your phone. Consider downloading a few and testing them out before your shoot.
Whether taking pictures with a DSLR, a basic digital camera or your phone, you’ll want to get a couple of pieces of equipment that will improve the quality of your pictures even before they go in for editing. Consider investing in a sturdy tripod that will hold the camera level and steady. You’ll also want to have a wide-angle lens (available as a phone attachment) which provides more depth and will make rooms look and feel more spacious.
The night before your shoot get your equipment ready and make sure you have everything you need. Clean your lenses, check for any damage that may affect the picture and charge your camera’s battery so you have enough juice to last a few hours.
To ensure you get a picture of every room in the home and highlight every feature you love, make a list of what you want to capture in your photos. Start by writing down all of the rooms in your home. Include the front yard and back yard in your list. From there, list any special features in each room you want to highlight. Do you have a unique stone fireplace in your living room? Does your kitchen have stainless-steel appliances? Is there a jacuzzi tub in your master bathroom? List those features to remind yourself to include them in the photo.
Also consider anything you don’t want to be included in the pictures. Is there a stain on the wall or a bad view outside of the window? Take note of these things so you’re more aware of them while taking the pictures.
You can have the most beautiful, high-quality real estate photos out there, but that won’t matter if your home is cluttered or messy. Before you take pictures of your home, give it a good scrub. Get rid of stains, dirt, fingerprints streaks and anything else that would show up in the photos and turn off potential buyers.
Clutter can make a room look untidy and smaller than it is. Find a place to store anything that doesn’t serve a purpose and make sure there are no overflowing drawers or piles of clothes. When it looks like things are bursting at the seams, buyers may believe there isn’t enough storage. This can be a major deterrent. You typically don’t need to include a picture of the closets unless they’re spacious, customized or have some other unique feature that sells. They can be a great place to stash your stuff while you take photos.
Furniture can show off each room’s purpose and help it feel homey and lived in, but too much can make a room look much smaller. Keep only a few pieces of furniture in the room and avoid big bulky pieces if you can. Keep decorative pieces to a minimum.
Prep for outdoor pictures by maximizing your home’s curb appeal. Clean any metal fixtures so they shine and touch up any peeling paint. Clean your home’s siding to remove dirt and mold that could be dulling its beautiful color. Keep walkways clear of any snow, ice, leaves and other debris. If you’re shooting in the spring or summer, water and mow the lawn, plant colorful flowers and remove any weeds to make sure your yard is green and vibrant for your pictures.
Removing clutter is just as important on the outside of the home, so pick up any stray gardening tools, toys and other unnecessary items. Put your cars in the garage or park them on the street to keep the driveway clear. If you have any oil stains on the driveway, scrub them out as best you can.
You can have all the preparation and training in the world and Mother Nature could still foil your photography plans. On the days leading up to your shoot, keep an eye on the weather and plan accordingly.
The exterior photo is often the first image people will see when browsing online listings or looking at your home’s portfolio, so it could be the determining factor of whether they’ll continue to look through your listing. Make sure you give them the right first impression with these tips.
Sunlight and blue skies will give off a happy, bright and welcoming vibe about your home, but you also need to be mindful of the sun.
“The hardest part of exterior photos can be working around the sun,” says Crossman. “If you take the photos at the wrong time of day, there will be big shadows on the house or you might be shooting directly into blinding sunlight, which will really affect the quality of the images.”
To avoid this, Crossman suggests monitoring how the sunlight affects the lighting on your house throughout the day to decide the best time to take exterior photos. You could also shoot while there’s a slight overcast. Just try to avoid too much overcast or stormy skies. Dark, looming clouds over a home can make it look gloomy or even sinister.
Shooting from an angle helps give your home more dimension and depth. Furthermore, different angles will provide other perspectives and show off the various features of your home. For example, if you have a beautiful bay window on the right side of your home, you may not see it if you shoot your home from the left side. If you shoot the home head-on, buyers may not notice that your porch wraps around the side.
When it comes to shooting different angles, don’t make the home look like it’s on a literal angle. Keep the roofline parallel with the photo’s frame so it doesn’t look like the home is sinking.
Walk around the house and take multiple shots at various angles. Give yourself a few options and you can choose the best ones later.
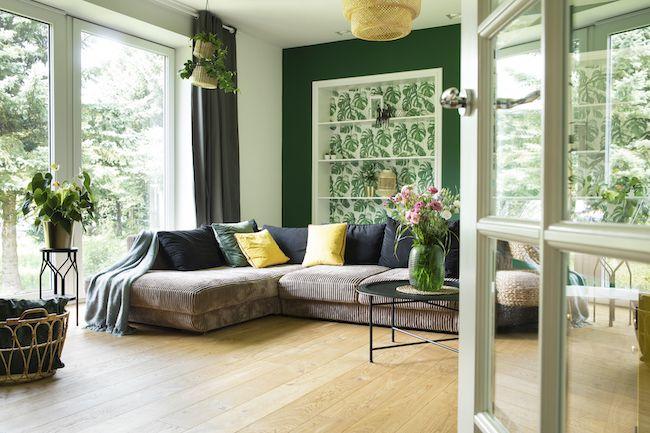
You hardly ever hear about someone falling in love with a home solely based on the exterior. Instead, you hear about people falling in love with a kitchen’s granite countertops or a master bath’s his-and-hers sinks. Interior photos allow the buyer to tour the home and fall in love before they even step foot in the door. Let your photos do the job by following these tips.
Natural light captures colors more accurately, features natural shadows that give depth to the picture and provides the most realistic representation of what the room would look like if you were standing in it. Use all the natural light you can before opting for artificial light. When using natural light to take photos, avoid shooting directly into a window. The sun will mess with your camera’s exposure and the photo will end up looking too dark.
Just as you would for exterior photos, walk around the room and take shots at different angles to get a few other perspectives. While the angles may change, a few fundamentals should stay the same.
“It’s important to make sure you are taking photos from a level perspective,” says Crossman. “If you’re angling your phone up or down to get the shot, you can distort the walls. It’s best to shoot with your phone or camera perfectly level.”
Height is also important to consider, according to Crossman. He suggests shooting photos from a standing perspective instead of a seated one, the latter of which can distort the view or block certain features. He recommends chest level as the best height to shoot from.
When taking pictures, try to include at least two walls in the photo so buyers can get a better idea of how big the room is. Standing in one corner of the room may help you get most of the room in your shot. Avoid tilting the camera to keep vertical and horizontal lines perfect and straight. According to Volk, doing so makes the picture easier on the eyes. He also suggests positioning the photo so the corner of the room is in the center of the picture.
When taking real estate photos, make sure to avoid common photography mistakes like blurry photos, photobombs and thumbs getting in the way. Pay attention to reflections when shooting in rooms with mirrors and glass, particularly bathrooms. Don’t stand directly in front of a mirror or glass door when taking pictures or you’ll end up making a guest appearance in your listing. Also move anything you don’t want people to see in the reflection. This can be distracting to potential buyers and embarrassing for you.
Using dated photos is a shortcut, but it can come back to bite you. In the event that potential buyers can tell the photo is dated, they may wonder what’s happened to the home since then that you don’t want them to see. If you’re selling your home in the summer, don’t post a picture that has snow in the background. If you’re selling in the summer, don’t post a picture of your home decorated for Halloween. And definitely don’t post pictures with timestamps. Those are a dead giveaway.
One common mistake that many people often overlook is the way you portray the home. When you’re staging rooms and taking listing photos, make sure you’re depicting your property as a home, not a house. A house is a structure. A home is a place you live and create memories inside. Convey that in your listing photos. Even if the room is empty, create a well-lit space with warm natural lighting. With each picture, the buyer should be able to picture living in the home.
After you take the photos, you’re not done yet. Remember, a little photo editing can take your photos from good to amazing. With photo editing you can adjust brightness and contrast, color correct and remove temporary objects like cars, garbage bins and electrical cords. While these minor touch-ups are allowed, you never want to mislead the buyer or misrepresent your home. That means you should never touch up a photo to cover up damage, change the background of the photo to a different setting completely or remove permanent fixtures like fire hydrants or support beams.
Now that your photos are amazing, make sure your listing is just as good. If not, you’ll waste all of the work you put into perfecting your real estate pictures. Use the listing description to highlight any unique features about the home and provide information that your photos may not be able to convey. For example, make sure buyers are aware that the carpet, cabinets or appliances in the photos were recently updated or that the basement they’re seeing is newly renovated. Use creative, meaningful adjectives to describe the home. Just make sure those adjectives are the appropriate words to use. For example, don’t say you have an open-concept kitchen if there’s a wall that separates it from the living or dining room. Leave any basic info like the number of bedrooms and bathrooms out of your description. That information will be recorded elsewhere in your listing.
Be mindful of how you upload your pictures. Make sure all images are rotated so they are right-side up. If buyers have to continue to tilt their heads to view the pictures, they may get frustrated and leave your listing. Consider organizing your photos by room to avoid confusion.
When it comes to how many real estate photos you should upload, it can be difficult to find a sweet spot. Post too many photos and the buyer may feel overwhelmed or lose interest. Post too little and they’ll wonder about what you aren’t showing and why.
“The number of images per listing will depend on what the house has to offer,” says Volk. “If a house has more features such as additional buildings or finished spaces, the amount of photos will go up. But on average, about 25 photos per listing is a good rule of thumb.”
When it comes to how many photos each room should have in the listing, Volk provides his breakdown for the average home:
Provide an image of your home’s floor plan to help buyers see the overall layout of the property before walking through it. With one quick look they can see how everything is spaced out and how the layout flows from one room to another.
If you live on an expansive piece of land or the area surrounding your home is particularly beautiful, show it all off with pictures from a drone. These photos can provide sweeping, dramatic views of your entire property and any bonus features like mountain or ocean views. Before you use a drone for real estate photos, check with your state’s FAA regulations as you may need a permit or license to operate a drone for commercial use in specific areas.
Want to take your listing up a notch? Include a video walkthrough of your home so buyers can get a feel for how each room flows into the next. You’ll also be able to show more of each room, including a full 360-degree view. If the listing doesn’t allow you to upload a video, consider uploading it to a video hosting site and including a link to it in your listing.
These tips can help you create stunning photos to get homebuyers in your door, but there is more to selling your home than just that. If you need additional support, ForSaleByOwner.com has the professionals and tools you need to sell your home on your terms.